


Virtual Follow Focus - Prototyping
- Brad Nisbet
- Mar 2, 2021
- 5 min read

I have been working on a physical follow focus device that works for virtual cameras, I have sketched up blueprints and code for some very advanced models that can work with LED walls and tracked cameras (like an Arri with a Cinelens) to pull focus on the physical camera and the virtual camera at the same time.
I have looked at several control interfaces from Arri, Red, and Sony. And have considered a platform agnostic hardware approach.
My prototypes range from a simple wheel that pulls focus to a complex device with buttons and dials for every physical control you would find on the side of a broadcast camera (ooooh, next project idea: hack one of these devices into a broadcast camera using the existing controls on the body).
I uploaded a video of my WIP to LinkedIn and it got over 4000 views and I was contacted by several people about it. So I am going to discuss the prototype I showed, and then follow up with a guide to make your own.

My Prototype: I am currently working on a piece of hardware that can transmit custom commands through UDP, previously it was using OSC. This device will be infinitely more customizable with the ability to send commands and data directly to the virtual environment (I am also working on my own tracker but that's another story). Because it is able to send data directly to the engine I can use low cost potentiometers as analog wheels with hard stops and accuracy of 0.1%. Meaning there is a resolution of 1000 focus points. This can be set with other dials or a touchscreen interface to be 1000mm, 1000cm, 1000ft, 1000m, 1000km, etc. The hard stops can also be set via a similar interface (eg Min=2mMax=10m) in which case the focus wheel will pull from min to max with 1000 degrees of resolution. Different potentiometers also allow for different styles of wheel control such as a single turn with the full resolution being 270 degrees or a multi turn (such as a 10 turn that would have each turn of the wheel being 100 of the 1000 steps of resolution) thus allowing for more customisation on the "sensitivity" of the wheel. This version requires not only the device to be made, but also some code and plugins for UE4. To distribute this effectively I will need to package the software as its own plugin as well as ship a "configuration" app for setting up the device.
In comes, EZ-Mode... I want to make the tools accessible to everyone, and easy to build and use. So I had a look at Adafruit to find a platform, and thought of an easy version anyone can build that wont require custom C++, Classes, or Add-Ons for UE4. For those of you with a bit a of electronics knowledge I will give you the answer right up front
ESP32 - BLE HID - Rotary Encoder == BT "keyboard" controlled by dial. Bind keyboard actions to events in UE4.For everyone else, lets go through the build process in detail.
First, Here is a parts list (there's no affiliate or tracking links embedded).
1x Circuit Playground Bluefruit - Bluetooth Low Energy
1x Rotary Encoder
1x Lithium Ion Polymer Battery with Short Cable - 3.7V 350mAh
1x Circuit Playground Proto Gizmo - Bolt-on Perma-Proto
You may also want to buy a charger for the battery if you don't already have one...
Here's one you can order from the same store.
Other items you will need:
Soldering Iron
Solder (a tiny amount)
22 Gauge Wire (no more than 20cm)
USB cable (USBA-MicroUSB)
Computer
The reason I have chosen to use these parts is to make it super easy, You could achieve the same thing with an arduino or even just an ESP32 (<5$) but I also understand that programming microcontrollers may intimidate some people, even the soldering might be a bit iffy for some people so I tried to keep it to a minimum.
Step 1: Setting up the Board
First you are going to want to go to this link and download the latest UF2 file for the CircuitPython. Plug the board into your computer and it should show up as a storage device. Double-click the reset button to enter the bootloader.

The device will now be called CPLAYBTBOOT, copy the adafruit_circuitpython_etc.uf2 file you downloaded earlier to the device and it will restart (the LED's should turn red).
The device will now be called CIRCUITPY.
Download these files.
Copy the files over to the device (make sure to extract them, and that you copy both code.py and the lib folder).
I will include the code at the bottom of the post, if you want to grab the libraries directly you can find them HERE.

You need the following libraries:
   adafruit_ble
   adafruit_hid
   neopixel

This is optional (to customize it), you can just download my Zip and put it straight on your board.
The device should now be showing a yellow colour, if not you didn't copy the files correctly (or skipped updating the board), most likely its the lib files that aren't properly copied over.
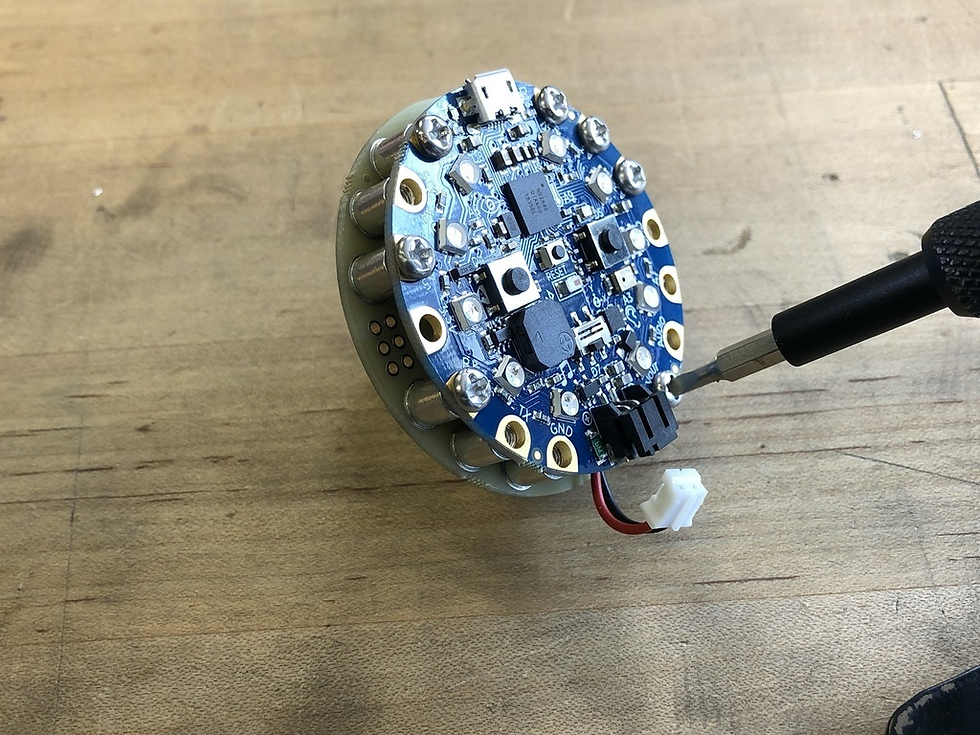
Step 2: Attaching the Dial
Using wire, solder the dial to the protoboard per the below schematic.

Protip: Hide the wires by putting them under the board rather than on top. But don't forget that the holes are flipped!!!


Place the LiPo inside the 2 boards before screwing together, then screw the boards together (make sure the little safety plastic is removed from the screw posts so they can make contact.
Don't overtighten the screws. Plug in the battery cable and the device turns on (unplug the plug and connect to a charger to charge battery). If you want to improve it you could add a charging circuit and power switch in-line :)
And you're done, now just connect to the follow focus on your PC via bluetooth. Then put in your camera blueprint bindings for PAGE_UP and PAGE_DOWN to increase and decrease the manual focus distance. Heres an example
It's not as good as a manual smooth follow focus but its easier. If people are interested in the more complex device please let me know.
The code for code.py
import time
import digitalio
import board
import rotaryio
import neopixel
from adafruit_hid.keyboard import Keyboard
from adafruit_hid.keycode import Keycode

import adafruit_ble
from adafruit_ble.advertising.standard import ProvideServicesAdvertisement
from adafruit_ble.services.standard.hid import HIDService
from adafruit_ble.services.standard.device_info import DeviceInfoService


ble = adafruit_ble.BLERadio()
ble.name = "Follow Focus"
hid = HIDService()
device_info = DeviceInfoService(software_revision=adafruit_ble.__version__,
                                manufacturer="Brad Nisbet")
advertisement = ProvideServicesAdvertisement(hid)
kbd = Keyboard(hid.devices)

FILL_COLOR = (128, 0, 128)
BASE_COLOR = (0, 128, 0)
PRESS_COLOR = (128, 0, 0)
DISCONNECTED_COLOR = (50, 50, 0)

ring = neopixel.NeoPixel(board.NEOPIXEL, 10, brightness=0.1, auto_write = False)
ring.fill(DISCONNECTED_COLOR)
ring.show()
dot_location = 0

button_A = digitalio.DigitalInOut(board.BUTTON_A)
button_A.switch_to_input(pull=digitalio.Pull.DOWN)

button_a_pressed = False

button = digitalio.DigitalInOut(board.A1)
button.pull = digitalio.Pull.UP

encoder = rotaryio.IncrementalEncoder(board.A2, board.A3)

last_pos = encoder.position
muted = False
command = None

if ble.connected:
    for connection in ble.connections:
        connection.disconnect()


def draw():
    if not muted:
        ring.fill(FILL_COLOR)
        ring[dot_location] = BASE_COLOR
    else:
        ring.fill(PRESS_COLOR)
    ring.show()


advertising = False
connection_made = False
print("Booting")
while True:
    if not ble.connected:
        ring.fill(DISCONNECTED_COLOR)
        ring.show()
        connection_made = False
        if not advertising:
            ble.start_advertising(advertisement)
            advertising = True
        continue
    else:
        if connection_made:
            pass
        else:
            ring.fill(FILL_COLOR)
            ring.show()
            connection_made = True

    advertising = False

    pos = encoder.position
    delta = pos - last_pos
    last_pos = pos
    direction = 0

    if delta > 0:
        command = Keycode.PAGE_UP
        direction = -1
    elif delta < 0:
        command = Keycode.PAGE_DOWN
        direction = 1

    if direction:
        muted = False
        for _ in range(abs(delta)):
            kbd.send(command)
            dot_location = (dot_location + direction) % len(ring)
            draw()

    if not button.value:
        if not muted:
            print("Pause")
            kbd.send(Keycode.PAUSE)
            muted = True
        else:
            print("Unpause")
            kbd.send(Keycode.PAUSE)
            muted = False
        draw()
        while not button.value:
            time.sleep(0.1)

    if button_A.value and not button_a_pressed:
        kbd.send(Keycode.SCROLL_LOCK)
        print("SCROLL_LOCK")
        button_a_pressed = True
        time.sleep(0.05)

    if not button_A.value and button_a_pressed:
        button_a_pressed = False
        time.sleep(0.05)
If you build one I would love to see how you are using it. Show me on Instagram :)
Also, I am unemployed and self funding a PhD, please feel free to reach out to me for collaborations or if you would like to Buy me a Coffee that would be great.


Comments